A Student's Guide to Software Engineering Tools & Techniques »
JUnit
Author: Lin Si Jie
Reviewers: Aadyaa Maddi, Marvin Chin
What is JUnit?
JUnit is an automated testing framework for Java i.e., it can be used to programmatically verify the actual behavior of Java code against the expected behavior.
Let's use a simple example to see how JUnit is used. Suppose we want to test the method calculateArraySum(int[] values, int n) which returns the sum of the first n elements of values.
public class Utils {
  // Sum up first n elements in values, and return the result
  public static int calculateArraySum(int[] values, int n) {
    int sum = 0;
    for (int i = 1; i < n; i++) {
      sum += values[i];
    }
    return sum;
  }
}
Let's write a test to check the correctness of our code. This test will use a sample array of size 5 that sums to 15, and check that our calculateArraySum returns the correct result.
public class UtilsTest {
  @Test
  public void calculateArraySum_fiveNumbers_correctAnswer() {
    int[] testArray = {1, 2, 3, 4, 5};
    assertEquals(15, calculateArraySum(testArray, 5));
  }
}
That's it! We are ready to run the tests through our IDE. The @Test tag tells JUnit that the calculateArraySum_fiveNumbers_correctAnswer method is meant to be a test. JUnit will then automatically execute our test(s).
Let's have a look at the test results.
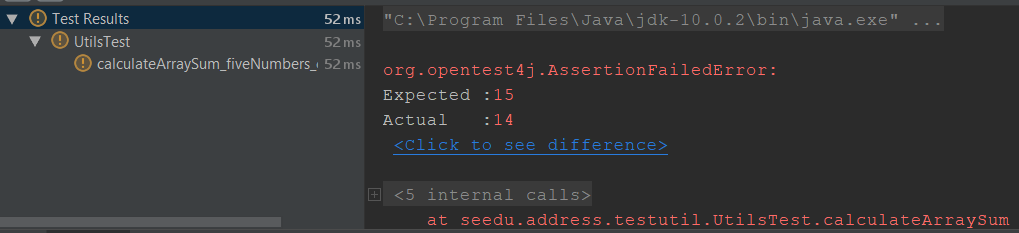
Hmm, the test seems to fail when we run it.
Did you notice the subtle bug in calculateArraySum?
We "forgot" to include the 0-th element of inputArray, a common off-by-one bug. With JUnit, we can use automatic tests to ensure that our functions are correct. This is easier and less error-prone than repeatedly testing and calculating manually.
Now, let's fix the code.
public class Utils {
  // Sum up first n elements in values, and return the result
  public static int calculateArraySum(int[] values, int n) {
    int sum = 0;
    for (int i = 0; i < n; i++) {
      sum += values[i];
    }
    return sum;
  }
}
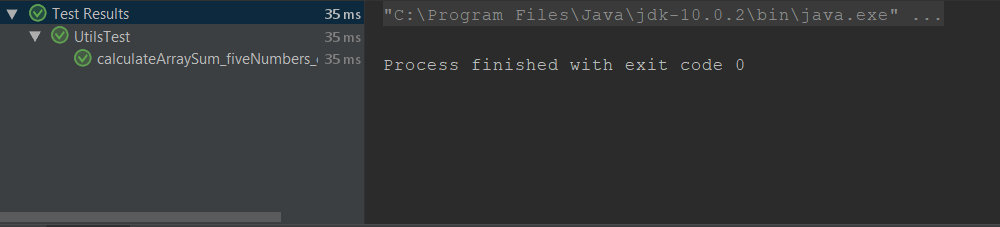
Running the same unit test again, we now have a passing test. Our calculateArraySum function works as intended.
To assure ourselves that calculateArraySum works for more scenarios (what if n = 0?), we can write more tests covering these cases.
public class UtilsTest {
  @Test
  public void calculateArraySum_fiveNumbers_correctAnswer() {
    int[] testArray = {1, 2, 3, 4, 5};
    assertEquals(15, calculateArraySum(testArray, 5));
  }
  @Test
  public void calculateArraySum_noNumbers_zero() {
    int[] testArray = {};
    assertEquals(0, calculateArraySum(testArray, 0));
  }
}
Unit tests like these help to prevent against regression. If calculateArraySum is ever changed, these tests can quickly verify that its functionality remains correct.
Why JUnit?
Here are some key reasons why developers should consider using JUnit, as compared to other Java testing tools like TestNG:
JUnit is well-integrated with development tools. It is supported by many popular IDEs such as IntelliJ IDEA, Eclipse, NetBeans, Visual Studio Code and many more. This makes it convenient for developers to write and run tests.
JUnit is well-established. JUnit has a longer history and a larger community. It is also more popular among developers (according to Synk's 2018 report). This means that it is easier to find answers or get help with JUnit.
JUnit Features
In addition to the basic example in the introduction, JUnit also has more powerful features that further simplifies the process of writing complex tests.
Assertions API
In addition to the assertEquals method illustrated in the introduction, JUnit allows us to check for many other things. These include:
assertTrue/assertFalse: checks whether statements return true/false as expected.assertNull/assertNotNull: checks whether something is null or not, without causing a NullPointerException.assertArrayEquals: yes, it loops through an entire array for us!assertThrows/assertDoesNotThrow: verify the actual error handling behavior against the expected error handling behavior.assertTimeout: ensures that a piece of code runs within time constraints - we don't want to keep the user waiting!
These powerful expressions means that we can write more expressive tests. Without JUnit, developers can test by writing:
try {
  int result = divide(100, 0); // Divides 100 by 0
} catch (ArithmeticException ae) {
  // This is the expected behaviour.
  return;
}
// If code is here, then the ArithmeticException wasn't thrown.
throw new AssertionError("Dividing 100 by 0 should throw an exception!");
With JUnit, we can replace the above code with just this line:
assertThrows(ArithmeticException.class, () -> divide(100, 0));
This expression is a lot easier to understand, and as an added bonus, the code is also much shorter to write!
Before/After hooks
Not every system can be tested so easily. Sometimes, testing is not as straightforward as running a function. For example, we might want to store information in a database. We would have to first connect to the database before we can run any test.
JUnit exposes an API that allows developers to do this process easily and clearly. The @BeforeAll tag allows us to run code once before all tests. Using @BeforeAll, we can easily initialize our testing environment:
class TestInvolvingDatabases {
  Database db;
  @BeforeAll
  public static void initializeDatabaseConnection() {
    // Initialize database connections
    db = connectToDatabase();
  }
  @Test
  public static void addUserTest() {
    db.addUser('NewUser');
    ...
  }
}
JUnit also offers a @BeforeEach tag to run code before every test. One use case is to ensure that we standardise the testing environment before each test.
For example, we can clear our database before each test to ensure that tests do not affect each other.
class TestInvolvingDatabase {
  Database db;
  @BeforeEach
  public static void resetDatabaseTable() {
    db.truncate("testTable");
  }
}
Similarly, we can use the @AfterAll and @AfterEach tags to run code after all tests, and after each test respectively:
class TestInvolvingDatabases {
  Database db;
  DatabaseSnapshot snapshot;
  @AfterEach
  public static void restoreDatabaseTable() {
    db.restore(snapshot); // Restore previous state of database
  }
  @AfterAll
  public static void closeDatabaseConnection() {
    db.close(); // Explicitly close DB connection instead of timing out.
  }

}
Extension Model
Consider a project where tests need to:
- connect to the database before all tests
- clear a database before each test to ensure consistency
One way would be to write helper methods initializeDatabaseConnection() and resetDatabaseTable() and invoke them as required, in the @BeforeAll/@BeforeEach methods.
However, this is prone to errors - if we do not explicitly call these methods, the database is not initialised or reset.
In JUnit, the extension model allows us to augment the test class. Instead of needing to invoke helper methods when we need them, we can introduce a ManagedDatabase extension that can automatically connect to a remote database and reset itself before each test.
This abstracts away the need to manage the database, allowing us to focus on testing our logic.
class ManagedDatabase implements BeforeAllCallback, BeforeEachCallback {
  Database db;
  String url;

  public ManagedDatabase(String url) {
      this.url = url;
  }

  @Override
  public void beforeAll(ExtensionContext context) throws Exception {
      db = connectToDB(url);
  }

  @Override
  public void beforeEach(ExtensionContext context) throws Exception {
      db.truncate("testTable");
  }
}
Now, any code requiring a database can simply do the following to initialize a database connection that resets itself before every test:
public class LogicTest {
  @RegisterExtension
  public ManagedDatabase db = new ManagedDatabase("localhost");
}
Getting Started
If this introduction has got you interested in using JUnit, do check out the following resources for an introduction to using JUnit:
- Introductory JUnit guide: JUnit 5 Tutorial
- Comprehensive JUnit guide: A Guide to JUnit 5
- Extensions and Lifecycle of Tests: Deep Dive into JUnit 5 Extension Model
- Official User Guide: JUnit 5 User Guide